Set up Snowflake OAuth
This guide describes a feature of the dbt Cloud Enterprise plan. If you’re interested in learning more about an Enterprise plan, contact us at sales@getdbt.com.
dbt Cloud Enterprise supports OAuth authentication with Snowflake. When Snowflake OAuth is enabled, users can authorize their Development credentials using Single Sign On (SSO) via Snowflake rather than submitting a username and password to dbt Cloud. If Snowflake is set up with SSO through a third-party identity provider, developers can use this method to log into Snowflake and authorize the dbt Development credentials without any additional setup.
To set up Snowflake OAuth in dbt Cloud, admins from both are required for the following steps:
- Locate the redirect URI value in dbt Cloud.
- Create a security integration in Snowflake.
- Configure a connection in dbt Cloud.
To use Snowflake in the dbt Cloud IDE, all developers must authenticate with Snowflake in their profile credentials.
Locate the redirect URI value
To get started, copy the connection's redirect URI from dbt Cloud:
- Navigate to Account settings.
- Select Projects and choose a project from the list.
- Select the connection to view its details and set the OAuth method to "Snowflake SSO".
- Copy the Redirect URI to use in the later steps.
Create a security integration
In Snowflake, execute a query to create a security integration. Please find the complete documentation on creating a security integration for custom clients here.
In the following CREATE OR REPLACE SECURITY INTEGRATION example query, replace <REDIRECT_URI> value with the Redirect URI (also referred to as the access URL) copied in dbt Cloud. To locate the Redirect URI, refer to the previous locate the redirect URI value section.
CREATE OR REPLACE SECURITY INTEGRATION DBT_CLOUD
  TYPE = OAUTH
  ENABLED = TRUE
  OAUTH_CLIENT = CUSTOM
  OAUTH_CLIENT_TYPE = 'CONFIDENTIAL'
  OAUTH_REDIRECT_URI = '<REDIRECT_URI>'
  OAUTH_ISSUE_REFRESH_TOKENS = TRUE
  OAUTH_REFRESH_TOKEN_VALIDITY = 7776000;
Note: Only Snowflake account administrators (users with the ACCOUNTADMIN role) or a role with the global CREATE INTEGRATION privilege can execute this SQL command.
| Field | Description |
|---|---|
| TYPE | Required |
| ENABLED | Required |
| OAUTH_CLIENT | Required |
| OAUTH_CLIENT_TYPE | Required |
| OAUTH_REDIRECT_URI | Required. Use the value in the dbt Cloud account settings. |
| OAUTH_ISSUE_REFRESH_TOKENS | Required |
| OAUTH_REFRESH_TOKEN_VALIDITY | Required. This configuration dictates the number of seconds that a refresh token is valid for. Use a smaller value to force users to re-authenticate with Snowflake more frequently. |
Additional configuration options may be specified for the security integration as needed.
Configure a Connection in dbt Cloud
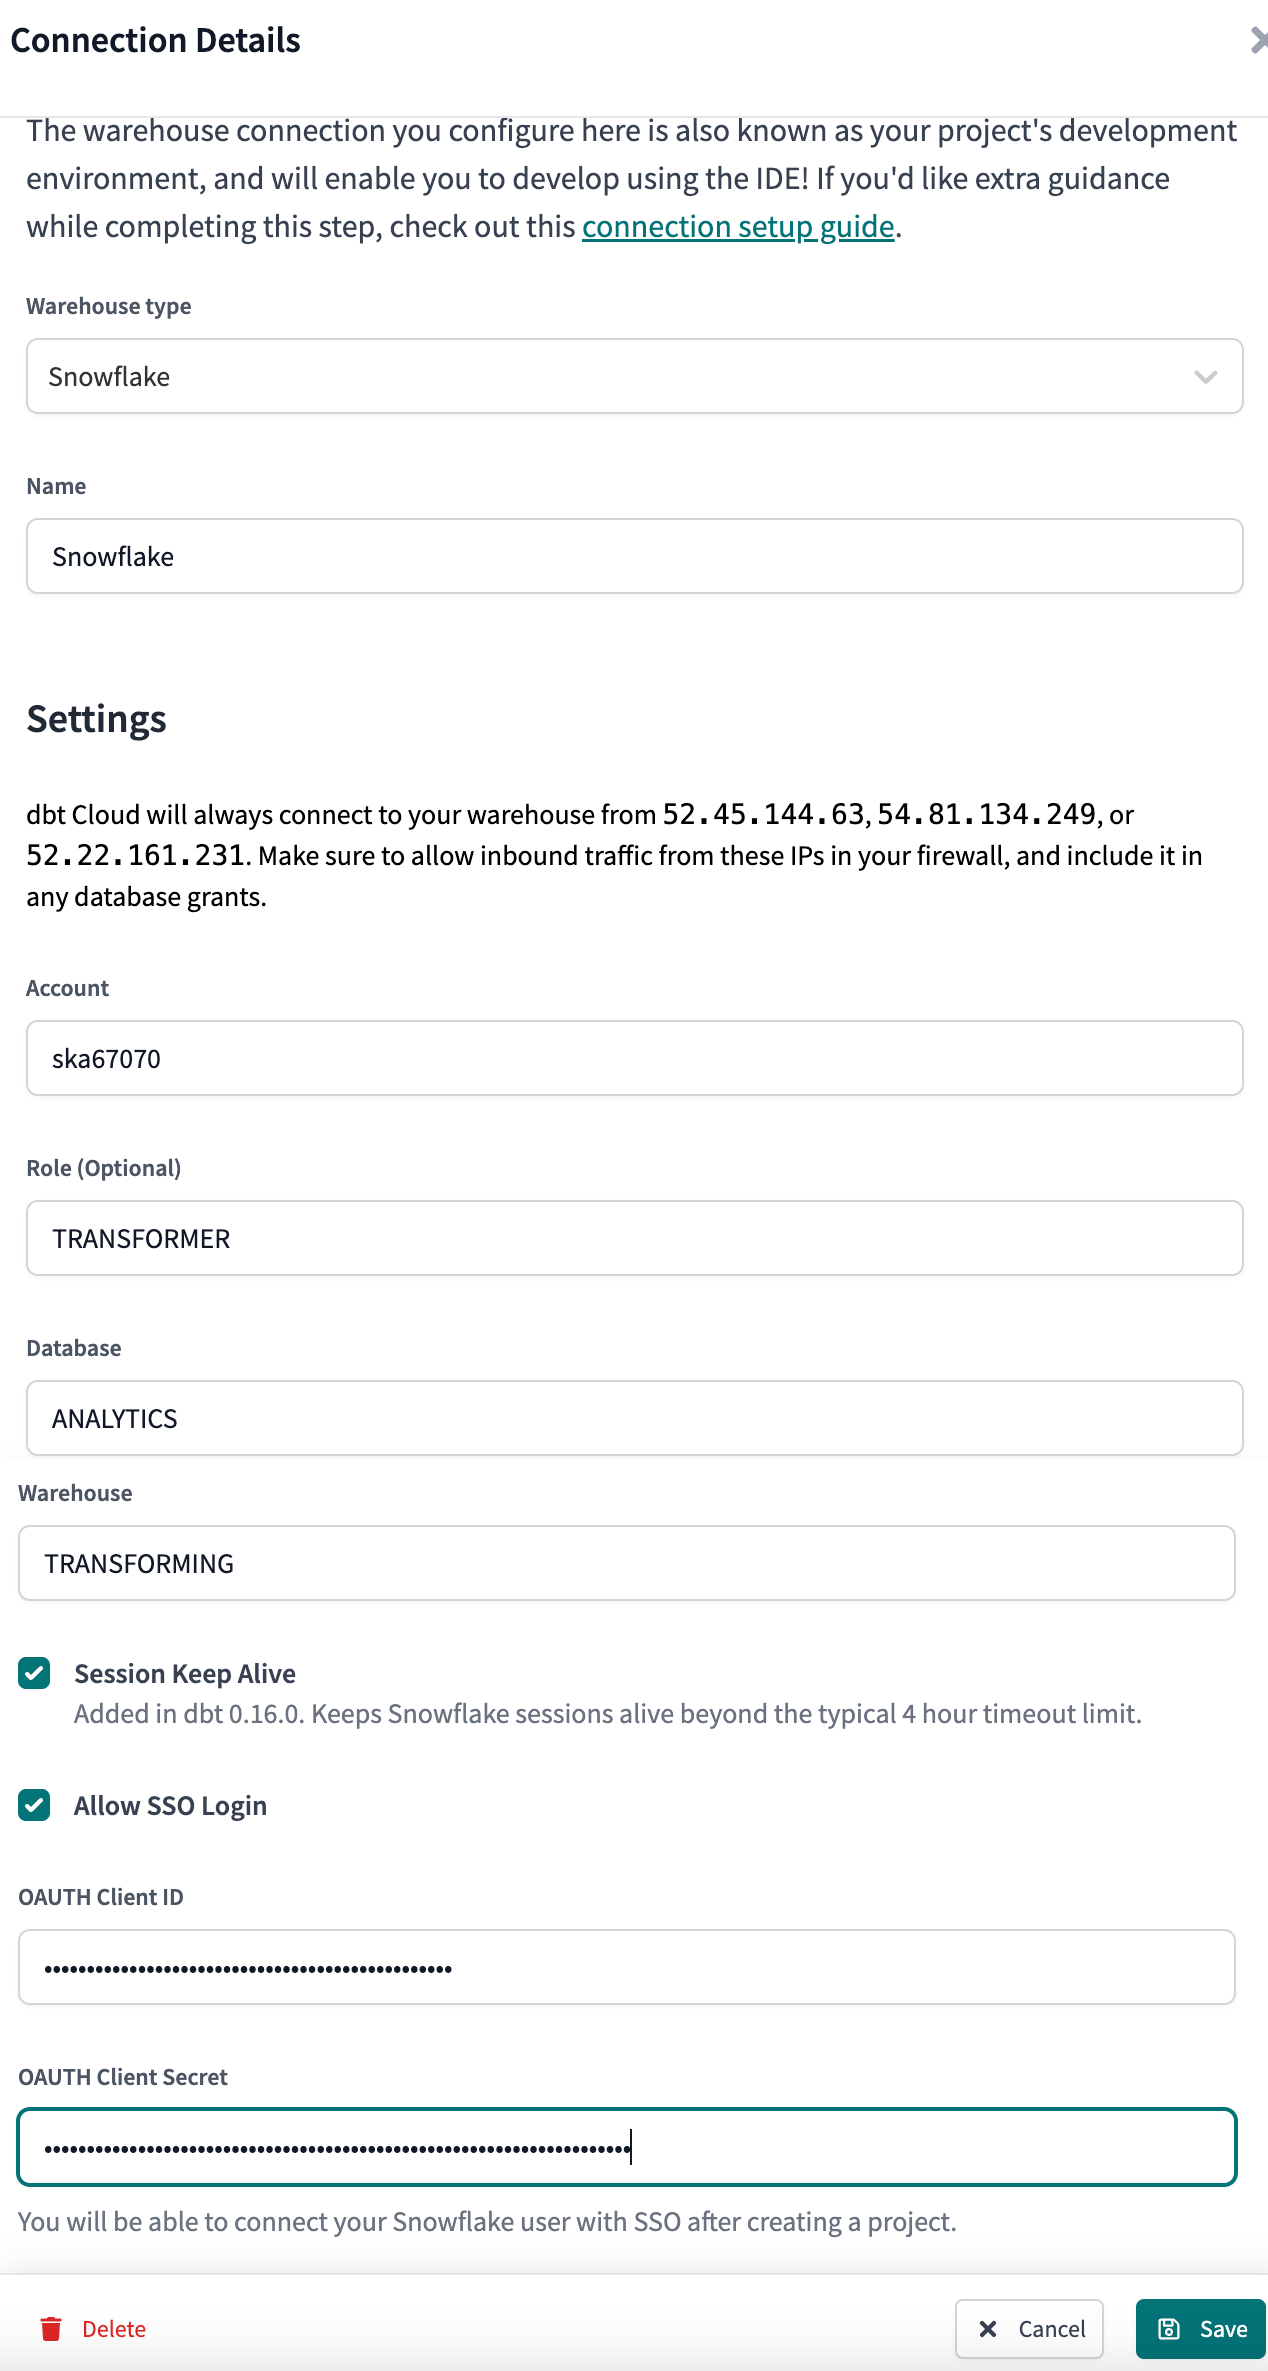
The Database Admin is responsible for creating a Snowflake Connection in dbt Cloud. This Connection is configured using a Snowflake Client ID and Client Secret. When configuring a Connection in dbt Cloud, select the "Allow SSO Login" checkbox. Once this checkbox is selected, you will be prompted to enter an OAuth Client ID and OAuth Client Secret. These values can be determined by running the following query in Snowflake:
with

integration_secrets as (
  select parse_json(system$show_oauth_client_secrets('DBT_CLOUD')) as secrets
)

select
  secrets:"OAUTH_CLIENT_ID"::string     as client_id,
  secrets:"OAUTH_CLIENT_SECRET"::string as client_secret
from
  integration_secrets;
Enter the Client ID and Client Secret into dbt Cloud to complete the creation of your Connection.
Authorize developer credentials
Once Snowflake SSO is enabled, users on the project will be able to configure their credentials in their Profiles. By clicking the "Connect to Snowflake Account" button, users will be redirected to Snowflake to authorize with the configured SSO provider, then back to dbt Cloud to complete the setup process. At this point, users should now be able to use the dbt IDE with their development credentials.
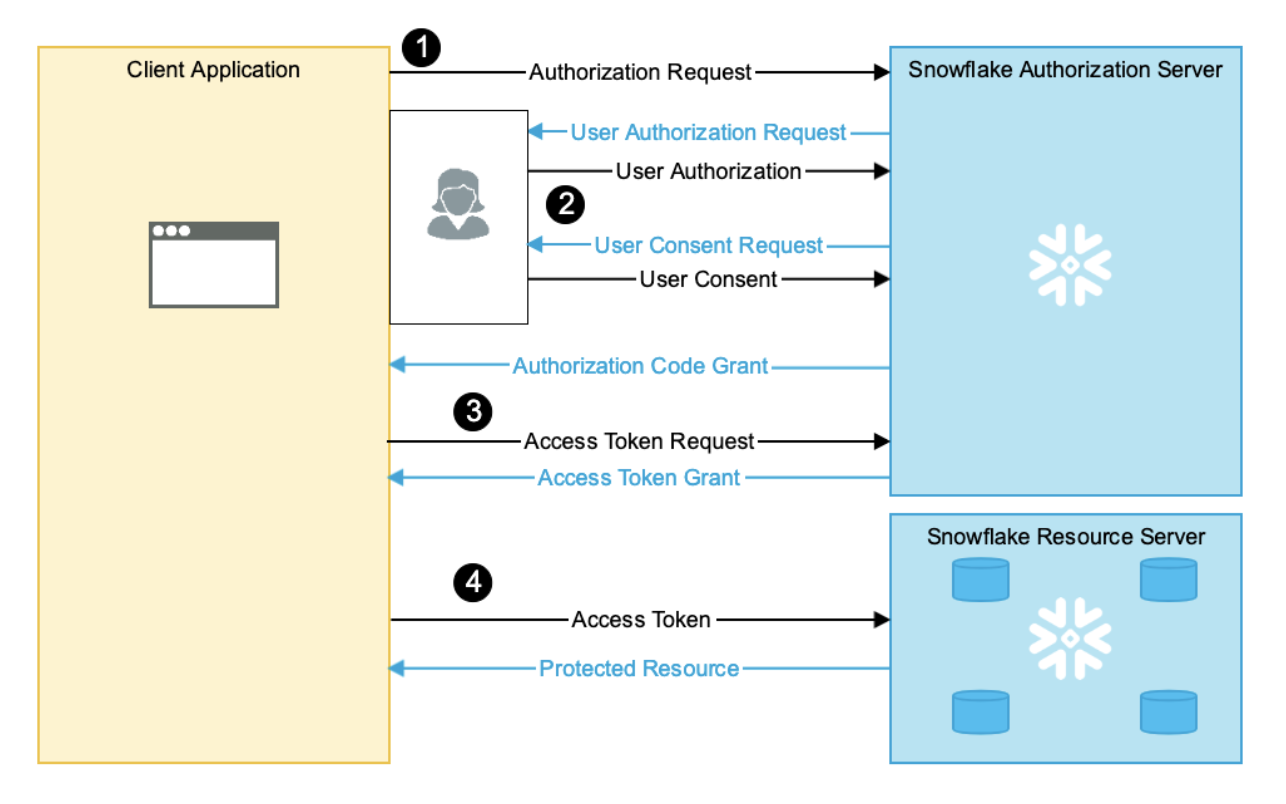
SSO OAuth flow diagram
Once a user has authorized dbt Cloud with Snowflake via their identity provider, Snowflake will return a Refresh Token to the dbt Cloud application. dbt Cloud is then able to exchange this refresh token for an Access Token which can then be used to open a Snowflake connection and execute queries in the dbt Cloud IDE on behalf of users.
NOTE: The lifetime of the refresh token is dictated by the OAUTH_REFRESH_TOKEN_VALIDITY parameter supplied in the “create security integration” statement. When a user’s refresh token expires, the user will need to re-authorize with Snowflake to continue development in dbt Cloud.
Setting up multiple dbt Cloud projects with Snowflake 0Auth
If you are planning to set up the same Snowflake account to different dbt Cloud projects, you can use the same security integration for all of the projects.
FAQs
How do I use the Blocked Roles List with dbt Cloud?
Troubleshooting
Invalid consent request
When clicking on the Connect Snowflake Account successfully redirects you to the Snowflake login page, but you receive an Invalid consent request error. This could mean:
- Your user might not have access to the Snowflake role defined on the development credentials in dbt Cloud. Double-check that you have access to that role and if the role name has been correctly entered in as Snowflake is case sensitive.
- You're trying to use a role that is in the BLOCKED_ROLES_LIST, such as
ACCOUNTADMIN.
The requested scope is invalid
When you select the Connect Snowflake Account button to try to connect to your Snowflake account, you might get an error that says The requested scope is invalid even though you were redirected to the Snowflake login page successfully.
This error might be because of a configuration issue in the Snowflake OAuth flow, where the role in the profile config is mandatory for each user and doesn't inherit it from the project connection page. This means each user needs to supply their role information, regardless of whether it's provided on the project connection page.
- In the Snowflake OAuth flow,
rolein the profile config is not optional, as it does not inherit from the project connection config. So each user must supply their role, regardless of whether it is provided in the project connection.
Server error 500
If you experience a 500 server error when redirected from Snowflake to dbt Cloud, double-check that you have allow-listed dbt Cloud's IP addresses, or VPC Endpoint ID (for PrivateLink connections), on a Snowflake account level.
Enterprise customers who have single-tenant deployments will have a different range of IP addresses (network CIDR ranges) to allow list.
Depending on how you've configured your Snowflake network policies or IP allow listing, you may have to explicitly add the network policy that includes the allow listed dbt Cloud IPs to the security integration you just made.
ALTER SECURITY INTEGRATION <security_integration_name>
SET NETWORK_POLICY = <network_policy_name> ;


